Wishing everybody out there a very merry Christmas and a prosperous 2010, full of learning and sharing!
Keep in Touch!
Arnoud
Thursday, December 24, 2009
Tuesday, December 22, 2009
Presenting @ UKOUG RAC & HA SIG meeting on Feb 10
On February 10, 2010, the UKOUG RAC & HA SIG will organize it's half-yearly SIG meeting.
I am very pleased to tell you that I have been invited to join this meeting and present about the recovery method I have been exploring lately (see this post, with all its referring posts).
The agenda is not yet fully confirmed, but there will be
Once the program is confirmed completely, I will post about it again.
The event will take place on Feb. 10 at the Customer Visitor Center at Oracle Thames Valley Park in Reading, UK.
Looking forward to an incredible day of learning and sharing.
I am very pleased to tell you that I have been invited to join this meeting and present about the recovery method I have been exploring lately (see this post, with all its referring posts).
The agenda is not yet fully confirmed, but there will be
- a forum discussion on the topic of using Grid and/or Real Applications Cluster for consolidation;
- Martin Bach (Oracle 10g Certified Master) will do a presentation.
- My presentation - Lightning fast recovery of (physically) corrupted databases without the need to restore the backup - or - To Restore Or Not?
Once the program is confirmed completely, I will post about it again.
The event will take place on Feb. 10 at the Customer Visitor Center at Oracle Thames Valley Park in Reading, UK.
Looking forward to an incredible day of learning and sharing.
E-Business Suite Release 12.1.2 available
Having been ill for a couple of days, I missed Steven Chan's announcement for Oracle E-Business Suite Release 12.1.2.
In an earlier post I already elaborated on the new Technology Features of this release.
I will get my 12.1.1 environment started up this weekend and see whether I can upgrade to 12.1.2 according to Metalink Note 845809.1.
Nice new feature: Oracle Database 11gR2 is certified with R12.1.2 (or should it be the other way around?)!
I will keep you updated on my progress.
Wednesday, December 9, 2009
E-Business Suite R12: Shared Application Tier File System
In Oracle E-Business Suite Release 12, one of the eye-catching new features was the Instance Home, or $INST_TOP. The result of this Instance Home is that you can now share the APPL_TOP between multiple installations of Oracle E-Business Suite.
I have seen a number of articles and discussions on the Internet discussing the reasons why one would want to share the APPL_TOP between E-Business Suites.
Why share?
Personally, I didn't see any reason why I would want this, other than to see it work and be able to use the feature, when time would come that I would need it.
I cannot remember where anymore, but I saw a reason lately that actually made sense to me:
As a DBA, it could be of use when I would want to replay issues that have been reported to me, being sure that I would be using the exact same APPL_TOP. I could set up a separate E-Business Suite, sharing the APPL_TOP, but having my own database. Now I can play around with my own E-Business Suite, without making changes to the production data, but I am still using the very same code as in the production environment. To make sure I do not break anything, I could even mount the APPL_TOP read only.
Recently I found another reason why it could be interesting to share the APPL_TOP: When your production environment consists of multiple E-Business Suites. I heard about Oracle's recommendations to separate Advanced Supply Chain Planning from your OLTP E-Business Suite environment. You would have to maintain two E-Business Suites, and I can see a couple of reasons why you would want to have identical code versions on each of them. In order to keep the two (or any number of) environments synchronous, you might want to implement the shared APPL_TOP.
Share what? APPL_TOP vs. Application Tier File System
By the way, can "shared APPL_TOP" also be read as "Shared Application Tier File System"? I have taken up the habit of asking whether APPL_TOP means Application Tier File System, or it just reflects the $APPL_TOP directory with all its subdirectories. It happens to be that the two are not the same, even though many of us use the two simultaneously.
In my opinion (but that may be because my experience goes back to the days these technologies were introduced), the APPL_TOP is just the ($)APPL_TOP: the top level directory that contains the product tops (/whatever_directory/apps/apps_st/appl).
The Application Tier File System is more than just the APPL_TOP. It contains the whole set of code that makes the Application Tier, i.e. the APPL_TOP, COMMON_TOP, but also the 10.1.2 and 10.1.3 ORACLE_HOMEs that reside under /whatever_directory/apps/tech_st. To conclude: The Application Tier File System is everything that resides under /whatever_directory/apps. That is a whole lot more.
But hang on? The question now is what Oracle means by stating that the APPL_TOP can be shared among multiple E-Business Suite environments. Do they mean just the APPL_TOP, or the Application Tier File System?
The official answer can be found in Metalink Note 384248.1, Appendix B where you can read that it is possible to share the complete Application Tier File System among multiple unshared E-Business Suite Databases.
Wednesday, November 4, 2009
"...Coolest Recovery Demo Ever..."
Yesterday, I got the chance to perform a presentation at the Dutch Oracle User Group (OGh) DBA day about a topic that I have blogged about a couple of days ago: Database Crash Recovery : To Restore Or Not Restore.
I proved my "theory" with a live demo. In VMware I crashed my database after having it backed up, after which I was able to recover within 5 minutes, without restoring the backup. All changes were kept, even the changes after the last incremental backup was taken... (I admit, I was impressed myself, too!:-)
The presentation went well, and today I received some comments from some of the attendees, telling me that the presentation was received extremely well. One of the attendees even twittered about "the coolest recovery demo ever".
For anyone interested in the solution/approach: The concepts of this approach are outlined in this and this article, founde elsewhere on my weblog.
Happy reading and testing!
Wednesday, October 28, 2009
Oracle E-Business Suite Release 12.1.2 - New Features
Wondering what the next release of E-Business Suite R12 will contain? Steven Chan posted a weblog about the availability of the 12.1.2 RCD yesterday, way before R12.1.2 is made available (the release date is not yet known).
However, it is always interesting to see what the next upcoming release will contain. I will stick to the Applications Technology, because that is my part of the pond:
Technology Highlights
However, it is always interesting to see what the next upcoming release will contain. I will stick to the Applications Technology, because that is my part of the pond:
Technology Highlights
- The most eye-catching new feature is support for 11gR2 database. Unfortunately (in a way) 11gR2 will not be shipped with 12.1.2. It'll still come with 11.1.0.7.
- On the middle-tier, support is introduced for AS 10gR3 (10.1.3.5) which will be shipped with the release, JDeveloper 10.1.3 and it uses the Sun Java Plug-in version 6.
- The Application Server for Forms and Reports will be 10.1.2.3. The maintenance pack will either include or require customers to upgrade to this version.
- Of all externally installed Oracle technology (WebCenter, Discoverer, Portal, Internet Directory, SSO, BPEL PM, OBIEE, OEM, etc) the most recent version will be certified with 12.1.2.
Internationalization Highlights
- Added support for Lithuanian, Indonesian and Ukrainian languages.
- Space and single quote number group separators
- First day of the week support (choose whichever day is the first day of the week)
- The Gantt chart and inline date picker features support Thai and Hijrah calendars
Oracle Applications Framework Highlights
- Redesigned Home Page
new folder-like structure, better spacing, favorites are now in a pull-down menu. In general the home page is more compact and allows for easy extension and custom content. - New Navigator Menu and favorites Pull-Down menue in the Global Header area
The Navigator Menu now appears in every OAF page (Pull-down menu). Favorites menu is also a pull down menu from the Global Header area and allows for marking the current page as favorite. - Look-ahead capability in lists of values
When entering a limited number of characters in a field, an inline window will let you select from a list of values based on the characters you typed. This way, you can limit the number of values in the inline window and ease your search for the correct value. - ability to add, view, edit and delete attachments inline
Inline attachments now have a hover-over interaction allowing users to view, add, edit and delete attachments to an entity. This capability eliminates the need to go to the Add and View attachments pages to maintain attachments. - pop-up component
This allows applications to display a pop-up window on top of an OAF page. - Portlet Generator
For static conversion of a standalone OAF region into a portlet. These can be embedded in any portal application or WebCenter. - A new component: rich container that can hold OBIEE content.
Through personalization, users can configure this component to hold a certain OBIEE report that accepts specific parameters.
Oracle Application Object Library Highlights
- Oracle Access Manager integration support
OAM can be used in stead of Oracle Single Sign On for thos applications or products that support it, but it can also be used together with OSSO to provide centralized authentication. - AOL Java APIs
Support for Oracle E-Business Suite Release 12.1.2 is provided - Scheduling Charts UI Enhancements
Dragging task numbers into the scheduling chart to create new tasks and shifts on the fly. Simplified ability for creating, assigning, searching and displaying new task assignments from a single source.
Diagnostics Framework
- Added support for XML file type diagnostics.
Integrated SOA Gateway
- SAML Token Support
E-Business Suite environments can trust external systems. These external systems can use a public key to authenticate a SOAP request using SAML. - Enhanced SOA Diagnostics
To check the health of the EBS Integrated SOA Gateway. - New interface type: Java APIs for Forms
these are XML document based interfaces, wrapped in Java classes to execute logic in Oracle Forms. Integrated in the Oracle Integration Repository (iRep) - Integrated SOA Gateway Customization
Support for custom integration interfaces, that can be deployed as custom Web Services. Customization feature is provided through the Integration Repository Parser.
Web ADI Highlights
- Introducing the Web Applications Desktop Integrator Extension Framework
wizard-based UI to create and manage desktop integrator solutions, providing a user-friendly approach to create custom integrators, without having to know the complexity of the EBS Schema.
Conclusion
My personal curiosity is focused on 11gR2 (I would be really interested in seeing the E-Business Suite running on 11gR2 Grid Infrastructure!). For sure there is enough to lookout for. Again, I am eagerly awaiting this new release.
Tuesday, October 27, 2009
using the RMAN backup as copy as base for Disaster Recovery
In an earlier post I have elaborated on the advantages the backup as copy feature offers to quickly recover from a damaged database.
In this article I will try to show how this advantage goes even further by adding another server to the infrastructure, introducing some kind of Disaster Recovery solution. OK, it is not fully featured like Oracle Dataguard, but it works and can be the first step towards Disaster Recovery. No need for a standby database, redo log shipping etc. It is all plain simple and straight-forward.
Shopping list:
- 2 servers, not necessarily equal in specifications, but having identical Operating Systems
- Clustered File System (OCFS2 will suffice, even NFS will do the job)
Preparations
First of all, you need to set up OCFS. Tons of information out there on the Internet to get your OCFS working. It is not difficult, See this PDF for information.
What I have done to make this work is set up 2 OCFS2 File Systems, one under /oradata and one under /orafra.
Next, install the Oracle RDBMS software on both machines, each using the same location for the Oracle Home and installing identical copies.
What I have done to make this work is set up 2 OCFS2 File Systems, one under /oradata and one under /orafra.
Next, install the Oracle RDBMS software on both machines, each using the same location for the Oracle Home and installing identical copies.
Once you have OCFS2 set up on your 2 servers, create or move your database onto /oradata, and make sure the DB_FILE_RECOVERY_DEST parameter points to /orafra and the DB_FILE_CREATION_DEST points to /oradata. Don't forget the DB_FILE_RECOVERY_DEST_SIZE parameter! Set it to a size equal to the file system where it is located, to make sure you will not run out of space too soon.
Your infrastructure will look like this (more or less):

/oradata is the location for you database, /orafra is for the Flash Recovery Area.
Now we can prepare the secondary machine to serve as Failover server.
To do this, take the following steps:
1. Copy the server parameter file and bring it to the secondary machine under $ORACLE_HOME/dbs. Edit this file and make adjustments to the following parameters:
CONTROL_FILES = /orafra/SID
DB_FILE_RECOVERY_DEST = /oradata
DB_FILE_CREATE_DEST = /orafra
Optionally, you can create an spfile from this parameter file on the secondary machine.
2. Copy the /etc/oratab file to the secondary node
3. Create the necessary dump directories ($ORACLE_HOME/admin)
Now you are ready to go! Bring up your database on the primary machine and create a full backup as copy from your database:
allocate channel for maintenance type disk;
configure controlfile autobackup on;
configure default device type to disk;
run
{
RECOVER COPY OF DATABASE WITH TAG ‘IMG_COPY’ UNTIL TIME ‘SYSDATE – 1’;
BACKUP INCREMENTAL LEVEL 1 FOR RECOVER OF COPY WITH TAG ‘IMG_COPY’ DATABASE PLUS ARCHIVELOG DELETE INPUT;
copy current controlfile to ‘/orafra/
}
This script will do everything for you. See this post for an explanation of the script.
Now let's make some changes to the database and run the backup script again (NOTE: in order to have all changes you made to the database immediately reflected in the copy of your database, remove the UNTIL clause in the first line of the backup script).
What you can do now, is to simulate a crash of the database (there are a lot of ways to do this, I would recommend you just issue a shutdown abort at your first attempt).
Go to the second machine, log in as the oracle user, source your environment and perform the following steps to recover your database:
- start an rman session to the database (which is not started yet)
- mount the controlfile (located in /orafra/SID/controlfile, pointed to by the parameter file)
- issue "switch database to copy"
- issue "recover database"
- issue "alter database open resetlogs"
That is all it takes. Now your database is opened and available from the secondary machine. Now make sure that you reverse file locations in the backup scripts on the secondary machine to reflect the database file locations and the Flash Recovery Area. The database files should be located in /orafra, the flash recovery area should be located in /oradata. If you want to switch back, just use the backup script to create another backup as copy and switch back the way you did earlier. Make sure you have defined the correct file locations on the primary server, alike the secondary machine, to smoothen the switch.
Caveats
Like what is the case with any other regular backup, when you have made changes to the physical structure of your database (like adding datafiles, tablespaces, etc), an incremental backup needs to be taken immediately after, to prevent issues while recovering the database from the copy.
Another caveat is that it is necessary to have both database servers available in your tns alias being used to access the database. In such a case it is important to have load balancing set to off and failover set to on, having the primary as the first address.
Alternatives
If your server is still available, but the database has become corrupted, you can easily switch to the copy without the need for the secondary machine with a similar procedure as mentioned above. This way you will always have the choice of what to do.
Happy testing!
Wednesday, September 23, 2009
Oracle 11g Release 2 Clusterware New Feature: Policy-based Cluster and capacity management
I was reading through the Oracle 11g Release 2 Real Applications Cluster New Features List and stumbled upon this really cool new feature. I have to tell you about it, because this, imho, is one of the things that makes Oracle Clusterware a “Grid”.
So, what is Policy-based management? In order to answer that, you must first understand some basic changes in 11gR2. This is what the manual says:
With Oracle Clusterware 11g release 2 (11.2) and later, resources are contained in logical groups of servers called server pools. Resources are hosted on a shared infrastructure and are isolated with respect to their resource consumption by policies, behaving as if they were deployed in a single-system environment.
What does this mean? I have a bunch of resources and a bunch of servers (a grid) and subsets of these servers are combined in server pools. The resources are assigned to these server pools, but the server pool acts as if it were just one system. The isolation is done on a policy base. The whole idea is being able to limit the capacity that is assigned to a resource, and have a set of server pools to service those resources. BTW. It is possible to assign a server to multiple server pools.
This kind of management enables you to dynamically assign capacity to meet your policies and priorities, as well as to allocate (physical) resources by importance. Your critical applications will always have a minimum of resources at its disposal. It also gives you the opportunity to limit applications to use a set of servers.
How does it work? You just assign the minimum and maximum number of nodes to a resource, as well as the priority and Oracle Clusterware will do the rest.
The servers will get a number of attributes, like a name (basically the node name), the pools to which it belongs and the state it is in with some details.
How do Server Pools work? They are sets of servers, that service resources. What they will try to do is to spread the workload over the available servers in the pool. It is possible to limit a database to run in a specific server pool.
The top-level server pool is an exclusive server pool, which means that any given server can only be a part of one top-level server pool. It is impossible to be a member of multiple top-level server pools. This way, the grid or cluster is logically divided.
All servers that join the cluster/grid are automatically assigned to the Free Pool initially. This Free Pool is a server pool that is automatically created at installation. From here, servers can be assigned to other server pools. Another pool, the Generic Pool is also automatically generated, and all servers will be part of this pool too, in order to ensure compatibility with prior releases. Any pre-11gR2 database will need to run in this generic server pool.
The server pool is given an minimum and maximum number of nodes. As soon as the number of nodes decreases below the minimum value, Clusterware will automatically take necessary action and take servers from other pools to increase the number of servers to meet the required minimum number.
If this poses a problem for other server pools, decisions are made upon the importance of the pools. When importance is equal, it is only possible to take servers, if the number of servers is higher than the minimum value.
All of the above can be done completely dynamically, however, manual manipulation is still possible. You might think: "Where is my control?", but if you set it up carefully, it could save you a bundle. For example, when you configure Grid Plug and Play (another one of those new features), it is possible to have a database bring up a new instance in the server pool and automatically create new log threads, undo tablespaces, etc. Isn't that way cool?
Oracle 11g Release 2 - ADVM (ASM Dynamic Volume Manager)
One of the new features in Oracle 11g Release 2 is Automatic Storage Management Cluster File System. This file system provides concurrent access from multiple (clustered) nodes.
ACFS is provided through the Automatic Storage Management Dynamic Volume Manager. In order to have a file system, one needs a volume (be it physical or logical) to put it on. Oracle has developed a Dynamic Volume Manager (ADVM) that can provide these volumes from ASM Diskgroups. You can use ADVM to create volumes that are replicated within the ASM diskgroup mechanism – by means of normal or high redundancy. Multiple volumes can reside on one diskgroup. The ADVM provides a device driver interface to the ACFS client.
Due to the mirroring features of ASM, it is possible to have a mirrored file system (even across a stretched cluster, when your storage infrastructure allows for such an architecture) that will leverage the features of ASM to provide consistency over hardware failure and ASM instance crashes.
You can use the file systems provided through ADVM not only for database files, but also for regular files such as executables and log files. During creation of the file system you have the choice to designate the file system for Oracle Home functionality. By choosing this option, the file system is registered in the Cluster Registry as a managed resource, giving Oracle the opportunity to layer dependencies on this file system for the use of Oracle Homes.
Because of the fact that Oracle ADVM Volumes are technically spoken ASM files located on ASM Disk groups, and the fact that the Dynamic Volumes do not use the traditional device partitioning, it enables Oracle to extend some of the ASM features to the ASM Clustered File Systems, which are created inside these ADVM Volumes, such as dynamic resizing or dynamically adding volumes. This makes ADVM and ACFS a far more flexible solution than traditional physical devices.
Important Note: Oracle ADVM supports all storage solutions supported for Oracle ASM with the exception of NFS and Exadata storage. That will have to wait for some time still…
 The above picture shows the User Interface, provided through the ASM Configuration Assistant (asmca), to create file systems inside ASM using the ADVM.
Wednesday, September 16, 2009
Oracle ACFS advanced topics
While everybody is exploring new features of the latest release of Oracle 11g, we're all very excited about all the new possibilities.
One of those new features is Oracle ACFS (ASM Cluster File System), wich provides an Oracle Home shared file system or a general purpose clustered file system on ASM storage. These are very nice features that will be used by many customers, in time to come. My first experiences are quite good. However, it is of great importance to know the limitations of those new features as well. Oracle has - on the topic of ACFS - thought about this very carefully, by adding an Appendix to the Storage Administrator's Guide, called ACFS Advanced Topics. Amongst these, a number of limitations are discussed. Well, one can argue whether these are actual limitations, that really limit you in operating ACFS, but it is good to know about these when planning for you Grid Infrastructure.
Oracle ACFS Disk Space Usage
Some Facts and Figures: Oracle ACFS supports:
Oracle allocates metadata for each node that mounts the file system, comprising approximately 64 – 128 MB per node. Also, some space is reserved for local bitmaps to reduce contention on the global bitmap in order to find free space. This can add up to 128MB per node. All of this space is reported as “in use” when querying the file system for disk space.
Oracle ACFS Error Handling
CAUTION: It is very important to unmount any file system that is using the Oracle ASM Dynamic Volume Manager (ADVM), before shutting down an Oracle ASM Instance. Failing to do so can result in I/O failures. One can never guarantee that the ASM instance(s) will never fail, but in case it does, volumes must be closed and opened again to be able to access them. Dismount the file systems that were mounted during failure and after the instance is restarted, mount the corresponding disk group with the volume enabled, after which you can mount the file system again.
Therefore, if any file systems are currently mounted on Oracle ADVM volume files, the SHUTDOWN ABORT command should not be used to terminate the Oracle ASM instance without first dismounting those file systems.
When a metadata write fails, regardless whether it be an ASM or storage failure, ACFS isolates the errors to a single file system and puts it in an off-line state. The only thing you can do with it is dismount. Other nodes (when available) recover the transaction, if it can write to that particular storage. After this, the file system can be mounted again.
When the file system being put offline is in use by processes or users, it might not be possible to unmount it. The administrator has to identify the processes that are claiming the file system and stop them before unmounting.
Oracle ACFS and NFS
Because block device major numbers of ADVM devices can be different after a reboot, the -fsid=# should be used when exporting NFS file systems. The option forces the clients to use this number (#) when communicating with this file system. Obviously, the number should be unique across the cluster. It replaces the number derived from the major/minor number of the device itself, since it can change with reboots.
Limits of Oracle ADVM
Some Facts: The default configuration for an Oracle ADVM volume is four columns of 64 MB extents in length and a 128 KB stripe width. Oracle ADVM writes data as 128 KB stripe chunks in round robin fashion to each column and fills a stripe set of four 64 MB extents with 2000 stripe chunks before moving to a second stripe set of four 64 MB extents for volumes greater than 256 megabytes. Note that setting the number of columns on an Oracle ADVM dynamic volume to 1 effectively turns off striping for the Oracle ADVM volume (are you still with me?;-)
On Linux platforms Oracle ASM Dynamic Volume Manager (Oracle ADVM) volume devices are created as block devices regardless of the configuration of the underlying storage in the Oracle ASM disk group. Do not use raw (8) to map Oracle ADVM volume block devices into raw volume devices.
Oracle ACFS and Oracle Restart
Oracle Restart does not support root-based Oracle ACFS resources for this release. As a result, the following operations are not automatically performed:
In short, the following resources are only supported for the Oracle Grid Infrastructure Cluster configurations, and are not supported for Oracle Restart Configurations:
Source: Oracle Database Storage Administrator's Guide, 11g Release 2, Appendix B
One of those new features is Oracle ACFS (ASM Cluster File System), wich provides an Oracle Home shared file system or a general purpose clustered file system on ASM storage. These are very nice features that will be used by many customers, in time to come. My first experiences are quite good. However, it is of great importance to know the limitations of those new features as well. Oracle has - on the topic of ACFS - thought about this very carefully, by adding an Appendix to the Storage Administrator's Guide, called ACFS Advanced Topics. Amongst these, a number of limitations are discussed. Well, one can argue whether these are actual limitations, that really limit you in operating ACFS, but it is good to know about these when planning for you Grid Infrastructure.
Oracle ACFS Disk Space Usage
Some Facts and Figures: Oracle ACFS supports:
- 64 million files in a file system,
- 63 snapshots,
- 64 mounts on 32 bit systems,
- 256 mounts on 64 bit systems.
Oracle allocates metadata for each node that mounts the file system, comprising approximately 64 – 128 MB per node. Also, some space is reserved for local bitmaps to reduce contention on the global bitmap in order to find free space. This can add up to 128MB per node. All of this space is reported as “in use” when querying the file system for disk space.
Oracle ACFS Error Handling
CAUTION: It is very important to unmount any file system that is using the Oracle ASM Dynamic Volume Manager (ADVM), before shutting down an Oracle ASM Instance. Failing to do so can result in I/O failures. One can never guarantee that the ASM instance(s) will never fail, but in case it does, volumes must be closed and opened again to be able to access them. Dismount the file systems that were mounted during failure and after the instance is restarted, mount the corresponding disk group with the volume enabled, after which you can mount the file system again.
Therefore, if any file systems are currently mounted on Oracle ADVM volume files, the SHUTDOWN ABORT command should not be used to terminate the Oracle ASM instance without first dismounting those file systems.
When a metadata write fails, regardless whether it be an ASM or storage failure, ACFS isolates the errors to a single file system and puts it in an off-line state. The only thing you can do with it is dismount. Other nodes (when available) recover the transaction, if it can write to that particular storage. After this, the file system can be mounted again.
When the file system being put offline is in use by processes or users, it might not be possible to unmount it. The administrator has to identify the processes that are claiming the file system and stop them before unmounting.
Oracle ACFS and NFS
Because block device major numbers of ADVM devices can be different after a reboot, the -fsid=# should be used when exporting NFS file systems. The option forces the clients to use this number (#) when communicating with this file system. Obviously, the number should be unique across the cluster. It replaces the number derived from the major/minor number of the device itself, since it can change with reboots.
Limits of Oracle ADVM
Some Facts: The default configuration for an Oracle ADVM volume is four columns of 64 MB extents in length and a 128 KB stripe width. Oracle ADVM writes data as 128 KB stripe chunks in round robin fashion to each column and fills a stripe set of four 64 MB extents with 2000 stripe chunks before moving to a second stripe set of four 64 MB extents for volumes greater than 256 megabytes. Note that setting the number of columns on an Oracle ADVM dynamic volume to 1 effectively turns off striping for the Oracle ADVM volume (are you still with me?;-)
On Linux platforms Oracle ASM Dynamic Volume Manager (Oracle ADVM) volume devices are created as block devices regardless of the configuration of the underlying storage in the Oracle ASM disk group. Do not use raw (8) to map Oracle ADVM volume block devices into raw volume devices.
Oracle ACFS and Oracle Restart
Oracle Restart does not support root-based Oracle ACFS resources for this release. As a result, the following operations are not automatically performed:
- Loading Oracle ACFS drivers
- Mounting Oracle ACFS file systems listed in the Oracle ACFS mount registry
- Mounting resource-based Oracle ACFS database home file systems
In short, the following resources are only supported for the Oracle Grid Infrastructure Cluster configurations, and are not supported for Oracle Restart Configurations:
- The Oracle ACFS drivers resource (ora.drivers.acfs),
- The Oracle ACFS registry resource (ora.registry.acfs)
- The Oracle ACFS individual file system resource ora.diskgroup.volume.acfs)
Source: Oracle Database Storage Administrator's Guide, 11g Release 2, Appendix B
Tuesday, September 15, 2009
ASM Cluster File System: Available Storage From the ASM Perspective
I was checking my system this morning, having it booted for the first time after the installation of Oracle 11g Release 2 Grid Infrastructure.
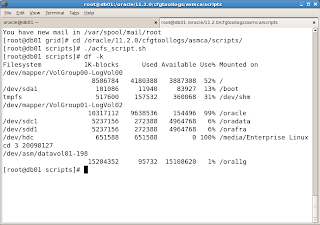
I opened up SQL*plus for a connection to ASM, to see what the disk space usage was.
I found the following information:
 The first section of the screen shows the total amount of diskspace and available diskspace from an ASM perspective, the lower part of the screen shows the file system usage.
Here you can see that the file system, even though it has practically all space available, has claimed all of its space in ASM. Logically, you might think, but since the two are so tightly integrated, might surprise a bit.
The principle is the same compared to 10g ASM with Oracle Datafiles. The datafile itself might not been occupied fully, still all of the space that the datafile is configured with needs to be allocated in ASM. When you want to see what your actual usage is on an ASM disk and how much you can grow, you would need to calculate the free space in your file system and add the FREE_MB column from within ASM to it to determine the exact free space on your ASM Disk(s).
Friday, September 11, 2009
Configuring ASM Clustered File Systems (ACFS) in Oracle 11g Release 2
After having finished the installation of Oracle 11g Release 2 Grid Infrastructure, the next step is to configure your storage.
ASM has always been a layer between the hardware and the database files.
Starting with Oracle 11g Release 2, Oracle has introduced a second cluster file system (next to OCFS2) called ACFS (ASM Cluster File System), to be hosted within ASM This is a major new feature of Oracle 11g Release 2.
This cluster file system not only supports binaries, like the ORACLE_HOME. In fact, what we'll see further on in this post, there is a differentiation between a file system for Oracle Home purposes and for General Purposes.
In order to setup an ASM Cluster File System, you simply start the ASM Configuration Assistant. Source the ORACLE HOME of Grid Infrastructure, make the bin subdir accessible from the PATH variable and simply type: asmca
What you will get is something similar to this (click on the images to get a larger view):
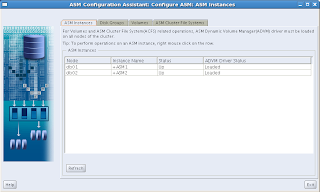 You can see the four tabs, ASM Instances, Disk Groups, Volumes and ASM Cluster File System. We'll cover each of them later on. For now, only the first two tabs are shown.
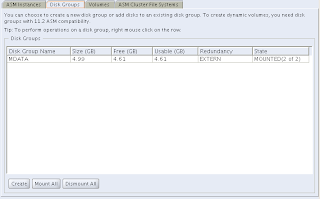 What we'll have to do first is to create a diskgroup. I happened to be prepared for this, so I created an ASM disk prior to running this Configuration Assistant. Just hit the "Create" button and you'll get:
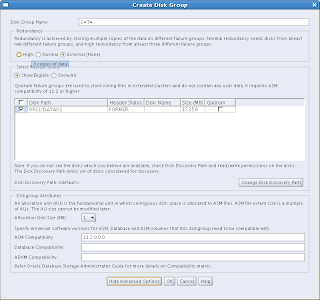 I have called my first disk group DATA. By clicking on the button "Show Advanced Options" you will see the compatibility parameters that can be set per diskgroup (ASM, Database and ADVM (ASM Dynamic Volume Manager) compatibility). Select the disk(s) and click on OK to create the Disk Group:
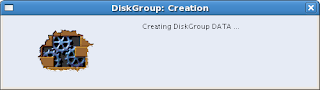
 Well, I think that was a success:-)
Next, go to the Volumes tab. We will have to create a volume first. By the way, doesn't this sound like an old-fashioned Volume Manager setup? It does, because it actually is. The difference with all the OS's proprietary volume managers is that this one is optimized for Oracle, and that should be enough to prefer this one over anything else.
 Hit Create and this is what you will get:
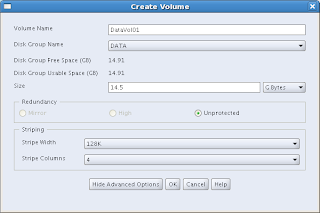 Now, be a little careful here. Notwithstanding the fact that the CA tells you that (in this case) you have 14,91 GB of space, you cannot use it all. I have tried 14,91, 14,9, they all failed. The example above shows 14.5, which worked for me. Don't take all you can get, don't get too greedy:-). You have to reserve some space for management, apparently.
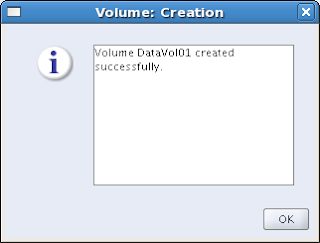 Another success!
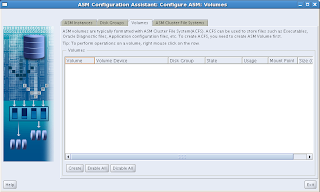
Now we're almost there, and the most interesting part has to come yet: The ASM Cluster File System tab:
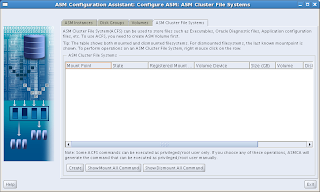 Again, just hit the Create button to get started:
Interesting choice here: You can choose between a Database Home File System or a General Purpose File System. When you choose your file system to be a database home file system, it will be registered under Grid Infrastructure as a managed resource, so Grid Infrastructure can maintain dependencies (- hey, we can all read, you know...). Anyway, I chose the Database Home File System for DATAVOL01. Just enter the mountpoint (/ora11g in the example), who should own it and to which group it should belong:
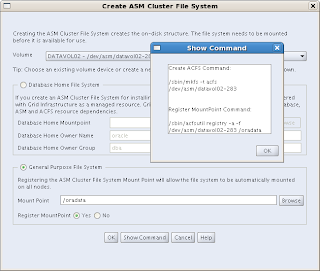
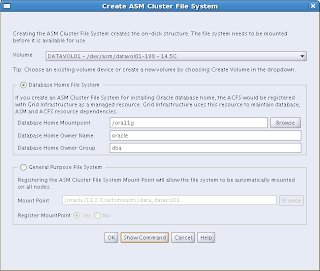 There is a button there at the bottom: "Show Command", which is worthy to be investigated. It shows you the commands that will be executed to create the ACFS and the registration command:
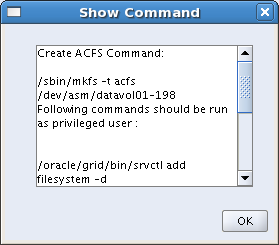 And the bottom half of the commands:
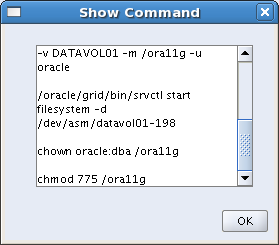 After the file system has been created, it needs to be registered, by running a script. This needs to be done by a privileged user (e.g. root):
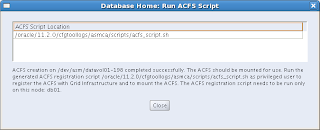 Screenshot of running the script, and Oh my! It's there! I just created a clustered file system under ASM and it is registered in Grid Infrastructure:
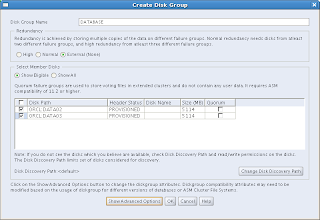
 OK. Now we'll configure another file system, this time a General Purpose File System. Starting with the second tab in the Configuration Assistant (Disk Groups), define the name of the disk group (DATABASE). You can see that suddenly I have got another set of disks available. Well I created those earlier, but didn't register yet them with ASMlib, while going through the previous cycle.
This time I have got two disks, and I will both use them for my DATABASE disk group. Still with External Redundancy, because the diskspace is too costly for me.
 After the Disk Group has been created, I create a volume on it:
 After that, I come to the ASM Cluster File System tab again and now I choose a General Purpose File System. I will register this one as well, hopefully resulting in an automount feature at boot time.
 The file system has been created and registered successfully:
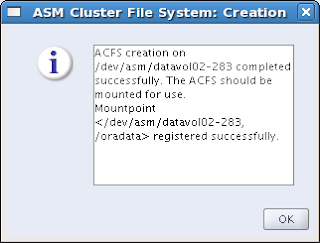
Now you have two clustered file systems, one designated for Oracle Homes, the other for anything you would like (like databases?).
Next step is to install Oracle 11g Release 2 Database software. That will be covered in the next post.
Happy testing!
ASM has always been a layer between the hardware and the database files.
Starting with Oracle 11g Release 2, Oracle has introduced a second cluster file system (next to OCFS2) called ACFS (ASM Cluster File System), to be hosted within ASM This is a major new feature of Oracle 11g Release 2.
This cluster file system not only supports binaries, like the ORACLE_HOME. In fact, what we'll see further on in this post, there is a differentiation between a file system for Oracle Home purposes and for General Purposes.
In order to setup an ASM Cluster File System, you simply start the ASM Configuration Assistant. Source the ORACLE HOME of Grid Infrastructure, make the bin subdir accessible from the PATH variable and simply type: asmca
What you will get is something similar to this (click on the images to get a larger view):
 You can see the four tabs, ASM Instances, Disk Groups, Volumes and ASM Cluster File System. We'll cover each of them later on. For now, only the first two tabs are shown.
 What we'll have to do first is to create a diskgroup. I happened to be prepared for this, so I created an ASM disk prior to running this Configuration Assistant. Just hit the "Create" button and you'll get:
 I have called my first disk group DATA. By clicking on the button "Show Advanced Options" you will see the compatibility parameters that can be set per diskgroup (ASM, Database and ADVM (ASM Dynamic Volume Manager) compatibility). Select the disk(s) and click on OK to create the Disk Group:
 Well, I think that was a success:-)
Next, go to the Volumes tab. We will have to create a volume first. By the way, doesn't this sound like an old-fashioned Volume Manager setup? It does, because it actually is. The difference with all the OS's proprietary volume managers is that this one is optimized for Oracle, and that should be enough to prefer this one over anything else.
 Hit Create and this is what you will get:
 Now, be a little careful here. Notwithstanding the fact that the CA tells you that (in this case) you have 14,91 GB of space, you cannot use it all. I have tried 14,91, 14,9, they all failed. The example above shows 14.5, which worked for me. Don't take all you can get, don't get too greedy:-). You have to reserve some space for management, apparently.
 Another success!
Now we're almost there, and the most interesting part has to come yet: The ASM Cluster File System tab:
 Again, just hit the Create button to get started:
Interesting choice here: You can choose between a Database Home File System or a General Purpose File System. When you choose your file system to be a database home file system, it will be registered under Grid Infrastructure as a managed resource, so Grid Infrastructure can maintain dependencies (- hey, we can all read, you know...). Anyway, I chose the Database Home File System for DATAVOL01. Just enter the mountpoint (/ora11g in the example), who should own it and to which group it should belong:
 There is a button there at the bottom: "Show Command", which is worthy to be investigated. It shows you the commands that will be executed to create the ACFS and the registration command:
 And the bottom half of the commands:
 After the file system has been created, it needs to be registered, by running a script. This needs to be done by a privileged user (e.g. root):
 Screenshot of running the script, and Oh my! It's there! I just created a clustered file system under ASM and it is registered in Grid Infrastructure:
 OK. Now we'll configure another file system, this time a General Purpose File System. Starting with the second tab in the Configuration Assistant (Disk Groups), define the name of the disk group (DATABASE). You can see that suddenly I have got another set of disks available. Well I created those earlier, but didn't register yet them with ASMlib, while going through the previous cycle.
This time I have got two disks, and I will both use them for my DATABASE disk group. Still with External Redundancy, because the diskspace is too costly for me.
 After the Disk Group has been created, I create a volume on it:
 After that, I come to the ASM Cluster File System tab again and now I choose a General Purpose File System. I will register this one as well, hopefully resulting in an automount feature at boot time.
 The file system has been created and registered successfully:
Now you have two clustered file systems, one designated for Oracle Homes, the other for anything you would like (like databases?).
Next step is to install Oracle 11g Release 2 Database software. That will be covered in the next post.
Happy testing!
Wednesday, September 9, 2009
Networking Requirements for Oracle Grid Infrastructure
With the release of Oracle 11gR2, Oracle has provided a whole new concept for the Grid Infrastructure. One of the most eye-catching requirements is a new Network Infrastructure requirement. It is no longer possible (maybe with some hacking and tricking) to just have a couple of Network Interface Cards and a bunch of IP addresses configured through the hosts file in /etc. I will try to summarize the requirements that Oracle has defined, and how to implement them:
In other words, you can no longer trick around by defining the hosts in the /etc/hosts file. DNS is a requirement, as well as DHCP. Well, that may not be the case, but I will have to test this still...
IP Address Requirements with Grid Naming Service
If you enable Grid Naming Service (GNS), name resolution for any node in the cluster is delegated to the GNS server, listening on the GNS virtual IP address. You have to define this address in the DNS domain before you start the installation. The DNS must be configured to delegate resolution requests for cluster names (any names in the subdomain delegated to the cluster) to the GNS. When a request is made, GNS processes the requests and responds with the appropriate addresses for the name requested.
In order to use GNS, the DNS administrator must establish a DNS Lookup to direct DNS resolution of an entire subdomain to the cluster. This should be done before you install Oracle Grid Infrastructure! If you enable GNS, then you must also have a DHCP service on the public network that allows the cluster to dynamically allocate the virtual IP addresses as required by the cluster.
IP Address Requirements for Manual Configuration
If you choose not to enable GNS, then the public and virtual IP addresses for each node must be static IP addresses, but they should not be in use before you start the installation. Public and virtual IP addresses must be on the same subnet, but that should be no news, since that has been the case since the days VIPs were introduced (Oracle 10g).
The cluster must have the following IP addresses:
The single client access name (SCAN) is a name used to provide service access for clients to the cluster. One of the major benefits of SCAN is that the SCAN enables you to add or remove nodes from the cluster without the need to reconfigure clients This is because the SCAN is associated with the cluster as a whole, rather than to a particular node. Another benefit is location independence for the databases. Client configuration does not have to depend on which nodes are running a particular database. Clients can however continue to access the cluster like with previous releases. The recommendation is to use SCAN.
The SCAN addresses must be on the same subnet as virtual IP addresses and public IP addresses. For high availability and scalability, you should configure the SCAN to use Round Robin resolution to three addresses. The name for the SCAN cannot begin with a numeral. For installation to succeed, the SCAN must resolve to at least one address.
It is best not to use the hosts file to configure SCAN VIP addresses. In stead, use DNS resolution for SCAN VIPs. If you use the hosts file to resolve SCANs, then you will only be able to resolve to one IP address. The result is that you will have only one SCAN address. It could possibly be a workaround for lab circumstances, but again, I didn't test it this way yet.
DNS Configuration for Domain Delegation to Grid Naming Service
If you plan to use GNS, then before grid infrastructure installation, you must configure your DNS server to forward requests for the cluster subdomain to GNS.
In order to establish this, you must use so-called delegation. This is how you configure delegation: In the DNS, create an entry for the GNS virtual IP address. For example:
gns.domain.net: 192.168.146.51 (The address you provide must be routable)
In the DNS, create an entry similar to the following for the delegated domain, where cluster.domain.net is the subdomain you want to delegate:
cluster.domain.net: NS gns.domain.net
You must also add the DNS Servers to the resolv.conf on the nodes in the cluster
Make sure that the nis entry in /etc/nsswitch.conf is at the end of the search list. For example:
hosts: files dns nis
Grid Naming Service Configuration Example
When nodes are added to the cluster, the DHCP server can provide addresses for these nodes dynamically. These addresses are then registered automatically in GNS, and GNS provides delegated resolution within the subdomain to cluster node addresses registered with GNS.
Because allocation and configuration of addresses is performed automatically with GNS, additional configuration is no longer required. Oracle Clusterware provides dynamic network configuration as nodes are added to or removed from the cluster. The following example should make things a bit clear (click on the image to get a larger view):

The above table reflects a two node cluster with GNS configured. The cluster name is "cluster", the GNS parent domain is domain.net, the subdomain is cluster.domain.net, 192.0.2 in the IP addresses represent the cluster public IP address network, and 192.168.0 represents the private IP address subnet.

Network Hardware Requirements
Oracle states the following requirements:
- Each node must have at least two network adapters or network interface cards (NICs): one for the public network interface, and one for the private network interface (the interconnect).If you use multiple NICs for the public network or for the private network, the recommendation is to use NIC bonding. Public and private bonds should be separated
- The interface names Oracle will use for the network adapters for each network must be the same on all nodes.In other words: The public network adapter should, for example, be called eth0 on all nodes and the private adapter eth1 on all nodes.
- The public network adapter must support TCP/IP.
- The private network adapter must support the user datagram protocol (UDP)High-speed network adapters and switches that support TCP/IP (minimum requirement 1 Gigabit Ethernet) are required for the private network.
IP Address Requirements
Before starting the installation, you must have at least two interfaces configured on each node: One for the private IP address and one for the public IP address.
You can configure IP addresses with one of the following options:
Oracle Grid Naming Service (GNS)
Using a static public node address and dynamically (DHCP) allocated IP addresses for the Oracle Clusterware provided VIP addresses. The hostnames will be resolved using a multicast domain name server, which is configured as a part of Oracle Clusterware, within the cluster. If you plan to use GNS, then you are required to have a DHCP service running on the public network for the cluster which will be able to provide an IP address for each node's virtual IP, and 3 IP addresses for the cluster used by the Single Client Access Name (SCAN) for the cluster.
In other words, you can no longer trick around by defining the hosts in the /etc/hosts file. DNS is a requirement, as well as DHCP. Well, that may not be the case, but I will have to test this still...
IP Address Requirements with Grid Naming Service
If you enable Grid Naming Service (GNS), name resolution for any node in the cluster is delegated to the GNS server, listening on the GNS virtual IP address. You have to define this address in the DNS domain before you start the installation. The DNS must be configured to delegate resolution requests for cluster names (any names in the subdomain delegated to the cluster) to the GNS. When a request is made, GNS processes the requests and responds with the appropriate addresses for the name requested.
In order to use GNS, the DNS administrator must establish a DNS Lookup to direct DNS resolution of an entire subdomain to the cluster. This should be done before you install Oracle Grid Infrastructure! If you enable GNS, then you must also have a DHCP service on the public network that allows the cluster to dynamically allocate the virtual IP addresses as required by the cluster.
IP Address Requirements for Manual Configuration
If you choose not to enable GNS, then the public and virtual IP addresses for each node must be static IP addresses, but they should not be in use before you start the installation. Public and virtual IP addresses must be on the same subnet, but that should be no news, since that has been the case since the days VIPs were introduced (Oracle 10g).
The cluster must have the following IP addresses:
- A public IP address for each node
- A virtual IP address for each node
- A single client access name (SCAN) configured on the domain name server (DNS) for Round Robin resolution to at least one address (three addresses is recommended).
The single client access name (SCAN) is a name used to provide service access for clients to the cluster. One of the major benefits of SCAN is that the SCAN enables you to add or remove nodes from the cluster without the need to reconfigure clients This is because the SCAN is associated with the cluster as a whole, rather than to a particular node. Another benefit is location independence for the databases. Client configuration does not have to depend on which nodes are running a particular database. Clients can however continue to access the cluster like with previous releases. The recommendation is to use SCAN.
The SCAN addresses must be on the same subnet as virtual IP addresses and public IP addresses. For high availability and scalability, you should configure the SCAN to use Round Robin resolution to three addresses. The name for the SCAN cannot begin with a numeral. For installation to succeed, the SCAN must resolve to at least one address.
It is best not to use the hosts file to configure SCAN VIP addresses. In stead, use DNS resolution for SCAN VIPs. If you use the hosts file to resolve SCANs, then you will only be able to resolve to one IP address. The result is that you will have only one SCAN address. It could possibly be a workaround for lab circumstances, but again, I didn't test it this way yet.
DNS Configuration for Domain Delegation to Grid Naming Service
If you plan to use GNS, then before grid infrastructure installation, you must configure your DNS server to forward requests for the cluster subdomain to GNS.
In order to establish this, you must use so-called delegation. This is how you configure delegation: In the DNS, create an entry for the GNS virtual IP address. For example:
gns.domain.net: 192.168.146.51 (The address you provide must be routable)
In the DNS, create an entry similar to the following for the delegated domain, where cluster.domain.net is the subdomain you want to delegate:
cluster.domain.net: NS gns.domain.net
You must also add the DNS Servers to the resolv.conf on the nodes in the cluster
Make sure that the nis entry in /etc/nsswitch.conf is at the end of the search list. For example:
hosts: files dns nis
Grid Naming Service Configuration Example
When nodes are added to the cluster, the DHCP server can provide addresses for these nodes dynamically. These addresses are then registered automatically in GNS, and GNS provides delegated resolution within the subdomain to cluster node addresses registered with GNS.
Because allocation and configuration of addresses is performed automatically with GNS, additional configuration is no longer required. Oracle Clusterware provides dynamic network configuration as nodes are added to or removed from the cluster. The following example should make things a bit clear (click on the image to get a larger view):

The above table reflects a two node cluster with GNS configured. The cluster name is "cluster", the GNS parent domain is domain.net, the subdomain is cluster.domain.net, 192.0.2 in the IP addresses represent the cluster public IP address network, and 192.168.0 represents the private IP address subnet.
Manual IP Address Configuration Example
If you decide not to use GNS, then you must configure public, virtual, and private IP addresses before installation. Also, check that the default gateway is reachable.
For example, with a two node cluster where each node has one public and one private interface, and you have defined a SCAN domain address to resolve on your DNS to one of three IP addresses, you might have the configuration shown in the following table for your network interfaces:

You do not need to provide a private name for the interconnect. If you want name resolution for the interconnect, then you can configure private IP names in the hosts file or the DNS. However, Oracle Clusterware assigns interconnect addresses on the interface defined during installation as the private interface (eth1, for example), and to the subnet used for the private subnet.
The addresses to which the SCAN resolves are assigned by Oracle Clusterware, so they are not fixed to a particular node. To enable VIP failover, the configuration shown in the preceding table defines the SCAN addresses and the public and VIP addresses of both nodes on the same subnet, 192.0.2.
Network Interface Configuration Options
An important thing to be aware of is when you use NAS for RAC and this storage is connected through an Ethernet network. In this case, you must have a third network interface for NAS I/O, otherwise you can face serious performance issues.
Enable Name Service Cache Daemon
You should enable nscd (Name Service Cache Daemon), to prevent network failures with RAC databases using Network Attached Storage or NFS mounts.
Use chkconfig --list nscd
To change the configuration, enter one of the following command (as root):
# chkconfig --level 35 nscd on
If you meet either one of the above method requirements (GNS or Manual configuration), you are safe to install Oracle Grid Infrastructure.
Friday, September 4, 2009
Oracle 11gR2 Grid Infrastructure Installation
One of the new "features" of Oracle 11gR2 is the Grid Infrastructure. Oracle 11gR2 Grid Infrastructure is the collection of infrastructural components provided for Oracle Database and other software.
I tested the installation of Oracle Grid Infrastructure on two virtual machines running OEL 5.3, operating under VMware Server 1.08. I suppose it is not supported this way, but it can give an idea of what to expect during the installation. The screenshots below show the installation procedure. I will add some comments when appropriate, especially to emphasize on new features. NOTE: Click on the screenshot to get a larger view.
 The first installation screen. The bullet shows which option I chose here.
 Usually the Advanced option is for experienced users. Well, at least I think I am experienced, I suppose...
 Languages. Anyone ever chose additional languages here? I never did.
 Nice new feature here: SCAN (Single Client Access Name): All the servers in the cluster will act upon a single hostname. This way, the cluster becomes completely transparent.
  Validation is performed... and accepted!
 As a result of enabling GNS, I can no longer assign VIP addresses to my cluster node names. These addresses are assigned by GNS from now on. Of course, when I wouldn't have enabled GNS, I were able to assign the addresses in this screen.
 Regular SSH connectivity test
 Network Interface Usage specification. Should be no surprise for anyone experienced in 10g Clusterware.
 Now, I will come to the choice of my storage solution. Before I started the installation I added another shared disk, enabled ASMlib on both servers and created an ASM Disk. Therefore, I can now choose ASM for storage.
 Choose the diskgroup name and assign disks to the diskgroup.
 Passwords. Be careful here! Passwords should comply with Oracle Recommendations, however you can ignore them. You will be notified when something is wrong or should be reviewed according to Oracle:

 I am not using IPMI (Intelligent Platform Management Interface) so, I didn't select this option.
 Here you can assign different groups to specific management options.
 Oracle has separated the privileges for each of these groups of administrators. Therefore, when I chose dba as group for each of these, I got a warning. Under normal (production operational) circumstances, I should have created three different groups and assigned these groups to different users on my system. Well, I have got only one user on my test environment: oracle, so what is the use of setting up three separate groups? Anyway, the idea is clear and it is good practice to follow these guidelines.
 Specify the locations of the Oracle Base and Oracle Grid Home. Oracle Grid Home should be installed parallel to the Oracle Base, so not inside the Oracle Base!
 File locations are being checked on both servers.
 New feature: Maybe it is better to say there is an enhancement here. The system is being verified thouroughly for prerequisites. The result can be seen in the next screen shots:
 Uhh. I have got some work to do here...
Nice new feature : the fixup script. Everything that Oracle can change in a script, a script is provided for by the installer. Just run the script and those checks that failed and are Fixable are being fixed. Don't worry about prerequisite checks before running the installer. Just let the installer do the work for you. It'll report everything you need to fix before installing. Just push the "Check Again" button as many times as you wish until everything is reported as passed.
 Execute the runfixup.sh script:
 ...And Check Again...
  ...summary...
 Tap, tap... :-)
 ...tap...!

I tested the installation of Oracle Grid Infrastructure on two virtual machines running OEL 5.3, operating under VMware Server 1.08. I suppose it is not supported this way, but it can give an idea of what to expect during the installation. The screenshots below show the installation procedure. I will add some comments when appropriate, especially to emphasize on new features. NOTE: Click on the screenshot to get a larger view.
 The first installation screen. The bullet shows which option I chose here.
 Usually the Advanced option is for experienced users. Well, at least I think I am experienced, I suppose...
 Languages. Anyone ever chose additional languages here? I never did.
 Nice new feature here: SCAN (Single Client Access Name): All the servers in the cluster will act upon a single hostname. This way, the cluster becomes completely transparent.
GNS: If you enable Grid Naming Service (GNS), then name resolution requests to the cluster are delegated to the GNS, which is listening on the GNS virtual IP address. You define this address in the DNS domain before installation. The DNS must be configured to delegate resolution requests for cluster names (any names in the subdomain delegated to the cluster) to the GNS. When a request comes to the domain, GNS processes the requests and responds with the appropriate addresses for the name requested.
To use GNS, before installation the DNS administrator must establish DNS Lookup to direct DNS resolution of a subdomain to the cluster. If you enable GNS, then you must have a DHCP service on the public network that allows the cluster to dynamically allocate the virtual IP addresses as required by the cluster.
To use GNS, before installation the DNS administrator must establish DNS Lookup to direct DNS resolution of a subdomain to the cluster. If you enable GNS, then you must have a DHCP service on the public network that allows the cluster to dynamically allocate the virtual IP addresses as required by the cluster.
 Validation is performed... and accepted!
 As a result of enabling GNS, I can no longer assign VIP addresses to my cluster node names. These addresses are assigned by GNS from now on. Of course, when I wouldn't have enabled GNS, I were able to assign the addresses in this screen.
 Regular SSH connectivity test
 Network Interface Usage specification. Should be no surprise for anyone experienced in 10g Clusterware.
 Now, I will come to the choice of my storage solution. Before I started the installation I added another shared disk, enabled ASMlib on both servers and created an ASM Disk. Therefore, I can now choose ASM for storage.
 Choose the diskgroup name and assign disks to the diskgroup.
 Passwords. Be careful here! Passwords should comply with Oracle Recommendations, however you can ignore them. You will be notified when something is wrong or should be reviewed according to Oracle:
 I am not using IPMI (Intelligent Platform Management Interface) so, I didn't select this option.
IPMI provides a set of common interfaces to computer hardware and firmware that system administrators can use to monitor system health and manage the system. With Oracle 11g release 2, Oracle Clusterware can integrate IPMI to provide failure isolation support and to ensure cluster integrity.
You can configure node-termination with IPMI during installation by selecting a node-termination protocol, such as IPMI. You can also configure IPMI after installation with crsctl commands.
You can configure node-termination with IPMI during installation by selecting a node-termination protocol, such as IPMI. You can also configure IPMI after installation with crsctl commands.
 Here you can assign different groups to specific management options.
ASM Database Administrator (OSDBA)
ASM Instance Administration Operator (OSOPER)
ASM Instance Administrator (OSASM)
 Oracle has separated the privileges for each of these groups of administrators. Therefore, when I chose dba as group for each of these, I got a warning. Under normal (production operational) circumstances, I should have created three different groups and assigned these groups to different users on my system. Well, I have got only one user on my test environment: oracle, so what is the use of setting up three separate groups? Anyway, the idea is clear and it is good practice to follow these guidelines.
 Specify the locations of the Oracle Base and Oracle Grid Home. Oracle Grid Home should be installed parallel to the Oracle Base, so not inside the Oracle Base!
 File locations are being checked on both servers.
 New feature: Maybe it is better to say there is an enhancement here. The system is being verified thouroughly for prerequisites. The result can be seen in the next screen shots:
 Uhh. I have got some work to do here...
Nice new feature : the fixup script. Everything that Oracle can change in a script, a script is provided for by the installer. Just run the script and those checks that failed and are Fixable are being fixed. Don't worry about prerequisite checks before running the installer. Just let the installer do the work for you. It'll report everything you need to fix before installing. Just push the "Check Again" button as many times as you wish until everything is reported as passed.
 Execute the runfixup.sh script:
  ...And Check Again...
Well, I didn't have enough memory and swap. Also, NTP wasn't started with the -x option... Who cares? - We'll see at the end of this weblog...
 ...summary...
This is what you'll see during installation:
 Tap, tap... :-)
 ...tap...!
We're almost there! Just run these two scripts and we're finished with the installation of Grid Infrastructure.
Well, that is what I thought. It took my virtual machines almost all night to finish the last script (root.sh in Grid Home). In fact, the script timed out after an hour or so, and the Virtual Machine practically froze... After having waited a couple of hours it even rebooted my entire machine (Including the Host OS!).
I will have to assign some more memory to the guests and see if I can finish the installation, or whether that is needed at all. However, it is weekend now, my wife and kids will not like me sitting behind my laptop all weekend. We'll be back next week...
11g Release 2 New Features for Grid Infrastructure
Being a RAC fanatic, the new Oracle 11g Release 2 Grid Infrastructure is one of my main focuses to investigate. Here is what I found to be the new features of Grid Infrastructure, which by the way comprises of Oracle Clusterware and Oracle Automatic Storage Management (ASM). All of them are truly fantastic features that are screaming to be investigated... I'll do my best to cover some of them here in the near future.
Oracle grid Infrastructure
With Oracle grid infrastructure 11g release 2 (11.2), Automatic Storage Management (ASM) and Oracle Clusterware are installed into a single home directory, which is referred to as the Grid Infrastructure home.
Oracle Automatic Storage Manager and Oracle files
With this release, Oracle Cluster Registry (OCR) and voting disks can be placed on Automatic Storage Management (ASM).
This feature enables ASM to provide a unified storage solution, storing all the data for the clusterware and the database, without the need for third-party volume managers or cluster filesystems.
For new installations, OCR and voting disk files can be placed either on ASM, or on a cluster file system or NFS system. Installing Oracle Clusterware files on raw or block devices is no longer supported, unless an existing system is being upgraded.
Automatic Storage Management Cluster File System (ACFS)
Oracle Automatic Storage Management Cluster File System (Oracle ACFS) is a new multi-platform, scalable file system and storage management design that extends Oracle Automatic Storage Management (ASM) technology to support all application data. Oracle ACFS provides dynamic file system resizing, and improved performance using the distribution, balancing and striping technology across all available disks, and provides storage reliability through ASM's mirroring and parity protection.
ASM Job Role Separation Option with SYSASM
The SYSASM privilege that was introduced in Oracle ASM 11g release 1 (11.1) is now fully separated from the SYSDBA privilege. If you choose to use this optional feature, and designate different operating system groups as the OSASM and the OSDBA groups, then the SYSASM administrative privilege is available only to members of the OSASM group. The SYSASM privilege also can be granted using password authentication on the Oracle ASM instance.
You can designate OPERATOR privileges (a subset of the SYSASM privileges, including starting and stopping ASM) to members of the OSOPER for ASM group.
Providing system privileges for the storage tier using the SYSASM privilege instead of the SYSDBA privilege provides a clearer division of responsibility between ASM administration and database administration, and helps to prevent different databases using the same storage from accidentally overwriting each other's files.
Cluster Time Synchronization Service
Cluster node times should be synchronized. With this release, Oracle Clusterware provides Cluster Time Synchronization Service (CTSS), which ensures that there is a synchronization service in the cluster. If Network Time Protocol (NTP) is not found during cluster configuration, then CTSS is configured to ensure time synchronization.
Enterprise Manager Database Control Provisioning
Enterprise Manager Database Control 11g provides the capability to automatically provision Oracle grid infrastructure and Oracle RAC installations on new nodes, and then extend the existing Oracle grid infrastructure and Oracle RAC database to these provisioned nodes. This provisioning procedure requires a successful Oracle RAC installation before you can use this feature.
See Also: Oracle Real Application Clusters Administration and Deployment Guide for information about this feature.
Fixup Scripts and Grid Infrastructure Checks
With Oracle Clusterware 11g release 2 (11.2), the installer (OUI) detects when minimum requirements for installation are not completed, and creates shell script programs, called fixup scripts, to resolve many incomplete system configuration requirements. If OUI detects an incomplete task that is marked "fixable", then you can easily fix the issue by generating the fixup script by clicking the Fix & Check Again button.
The fixup script is generated during installation. You are prompted to run the script as root in a separate terminal session. When you run the script, it raises kernel values to required minimums, if necessary, and completes other operating system configuration tasks.
You also can have Cluster Verification Utility (CVU) generate fixup scripts before installation.
Grid Plug and Play
In the past, adding or removing servers in a cluster required extensive manual preparation. With this release, you can continue to configure server nodes manually, or use Grid Plug and Play to configure them dynamically as nodes are added or removed from the cluster.
Grid Plug and Play reduces the costs of installing, configuring, and managing server nodes by starting a grid naming service within the cluster to allow each node to perform the following tasks dynamically: Negotiating appropriate network identities for itself
Acquiring additional information it needs to operate from a configuration profile
Configuring or reconfiguring itself using profile data, making hostnames and addresses resolvable on the network Because servers perform these tasks dynamically, the number of steps required to add or nodes is minimized.
Intelligent Platform Management Interface (IPMI) Integration
Intelligent Platform Management Interface (IPMI) is an industry standard management protocol that is included with many servers today. IPMI operates independently of the operating system, and can operate even if the system is not powered on. Servers with IPMI contain a baseboard management controller (BMC) which is used to communicate to the server.
If IPMI is configured, then Oracle Cluster uses IPMI when node fencing is required and the server is not responding.
Oracle Clusterware Out-of-place Upgrade
With this release, you can install a new version of Oracle Clusterware into a separate home from an existing Oracle Clusterware installation. This feature reduces the downtime required to upgrade a node in the cluster. When performing an out-of-place upgrade, the old and new version of the software are present on the nodes at the same time, each in a different home location, but only one version of the software is active.
Oracle Clusterware Administration with Oracle Enterprise Manager
With this release, you can use Enterprise Manager Cluster Home page to perform full administrative and monitoring support for both standalone database and Oracle RAC environments, using High Availability Application and Oracle Cluster Resource Management.
When Oracle Enterprise Manager is installed with Oracle Clusterware, it can provide a set of users that have the Oracle Clusterware Administrator role in Enterprise Manager, and provide full administrative and monitoring support for High Availability application and Oracle Clusterware resource management. After you have completed installation and have Enterprise Manager deployed, you can provision additional nodes added to the cluster using Enterprise Manager.
SCAN for Simplified Client Access
With this release, the single client access name (SCAN) is the hostname to provide for all clients connecting to the cluster. The SCAN is a domain name registered to at least one and up to three IP addresses, either in the domain name service (DNS) or the Grid Naming Service (GNS). The SCAN eliminates the need to change clients when nodes are added to or removed from the cluster. Clients using the SCAN can also access the cluster using EZCONNECT.
SRVCTL Command Enhancements for Patching
With this release, you can use srvctl to shut down all Oracle software running within an Oracle home, in preparation for patching. Oracle grid infrastructure patching is automated across all nodes, and patches can be applied in a multi-node, multi-patch fashion.
Typical Installation Option
To streamline cluster installations, especially for those customers who are new to clustering, Oracle introduces the Typical Installation path. Typical installation defaults as many options as possible to those recommended as best practices.
Voting Disk Backup Procedure Change
In prior releases, backing up the voting disks using a dd command was a required postinstallation task. With Oracle Clusterware release 11.2 and later, backing up and restoring a voting disk using the dd command is not supported.
Backing up voting disks manually is no longer required, as voting disks are backed up automatically in the OCR as part of any configuration change and voting disk data is automatically restored to any added voting disks.
Tuesday, September 1, 2009
Oracle Database 11g Release 2 available
I just found out that Oracle Database 11g Release 2 for Linux is available for download.
I am downloading it now, hopefully I will find some time to investigate some of those new features. I have heard there are a bunch in the RAC and ASM area. I can't wait to get my fingers on it...
Be back soon!
I am downloading it now, hopefully I will find some time to investigate some of those new features. I have heard there are a bunch in the RAC and ASM area. I can't wait to get my fingers on it...
Be back soon!
Thursday, August 27, 2009
OGh DBA Day in Utrecht, The Netherlands
On November 3, 2009, the OGh (Oracle Gebruikersclub Holland - An independent Oracle user group in The Netherlands) will organize a DBA day. Topic of the day is High Availability.
I will be doing a presentation on the subject of recovering a corrupted database without restoring the backup. A Demo will be included, as well as pros and cons, opportunities and limitations.
The rest of the day will be defined soon, so for the moment no further information is available.
Check back soon for more details!
Thursday, August 20, 2009
New Feature Added: E-Mail Notification
I added a new feature to my blog today: E-Mail Notification.
If you are interested in getting updates from this Weblog, simply subscribe using the widget at the side-bar of this page. You will get an e-mail as soon as new posts are published.
Happy reading and have a wonderful day.
If you are interested in getting updates from this Weblog, simply subscribe using the widget at the side-bar of this page. You will get an e-mail as soon as new posts are published.
Happy reading and have a wonderful day.
Friday, July 3, 2009
Certified, at last!
Last year I took the beta exam for E-Business Suite Release 12, Install, Patch and Maintain Applications. Unfortunately I failed that exam, but I didn't prepare at all. In fact, I found out about the beta exam one day before the beta program ended...
Now I took some more time to prepare for the exam and passed with 82% score.
So, as of today I am officially allowed to call myself: Oracle E-Business Suite Release 12 Database Administrator Certified Professional.
The exam was very appropriate: Proper level of difficulty, good questions, some pretty hard, I must say.
If you want to prepare: Take the course (Install Patch and Maintain Applications), learn all the new features of R12, the new file locations (logfiles, etc), and make yourself familiar with the managment tools around R12. Then you should be able to pass without too much problems.
Thursday, June 25, 2009
E-Business Suite R12.1.1 - Which database version?
Fooling around with E-Business Suite R12.1.1 installation this week led to some confusion about which database version comes with the distribution.

So it is true! Oracle E-Business Suite Release 12.1.1 comes with 11.1.0.7 database!
The first surprise came when we started Rapid Install and unfolded the components to be installed, as outlined in the welcome screen:
Huh? 9.2.0.5??? I thought 11.1.0.7 was to be installed with R12? 9.2.0.5 isn't even certified.
After we entered all the information, the installation was kicked off, and we saw the following information on our screen:
 Still, not quite the version that we were expecting, but coming close, at least.
After the installation was finished, we were - again - mislead, as you can see in this and the following screenshot:
Luckily, checking the database version from within E-Business Suite (Help - About), finally told us the truth, and nothing but the truth:

So it is true! Oracle E-Business Suite Release 12.1.1 comes with 11.1.0.7 database!
Subscribe to:
Posts (Atom)

